Image Sequencer
====
[](https://publiclab.org/conduct)
[](https://badge.fury.io/js/image-sequencer)
[](https://travis-ci.org/publiclab/image-sequencer) [](https://codeclimate.com/github/publiclab/image-sequencer/maintainability) [](https://codecov.io/gh/publiclab/image-sequencer)
[](https://gitpod.io/#https://github.com/publiclab/image-sequencer/)
- **Latest Stable Demo**: https://sequencer.publiclab.org
- **Latest Beta Demo**: https://beta.sequencer.publiclab.org
- **Stable Branch**: https://github.com/publiclab/image-sequencer/tree/stable/
Begin running (and contributing to) this codebase immediately with [GitPod](https://gitpod.io) (this also opens the latest `main` branch code):
[](https://gitpod.io/#https://github.com/publiclab/image-sequencer)
## Why
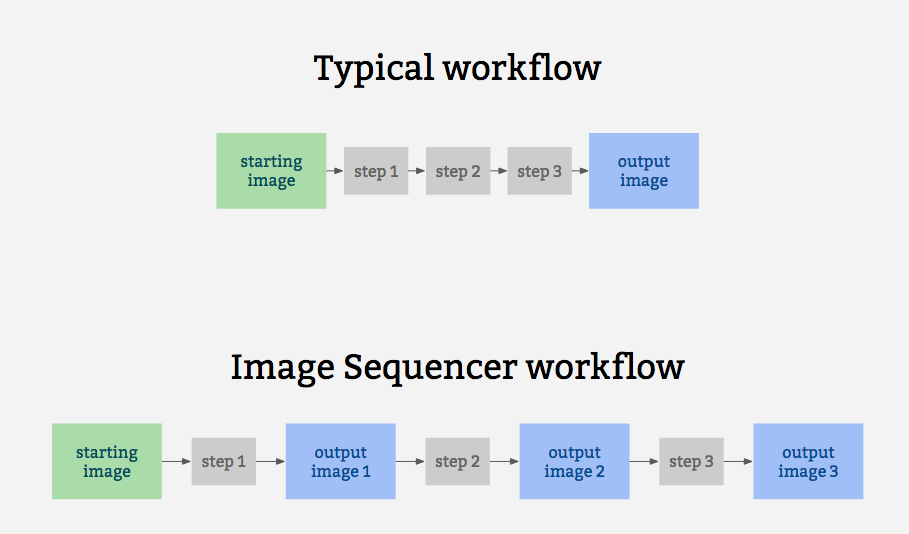
Image Sequencer is different from other image processing systems because it's _non-destructive_: instead of modifying the original image, it **creates a new image at each step in a sequence**. This is because it:
* produces a legible trail of operations, to "show your work" for evidential, educational, or reproducibility reasons
* makes the creation of new tools or "modules" simpler -- each must accept an input image, and produce an output image
* allows many images to run through the same sequence of steps
* works identically in the browser, on Node.js, and on the command line
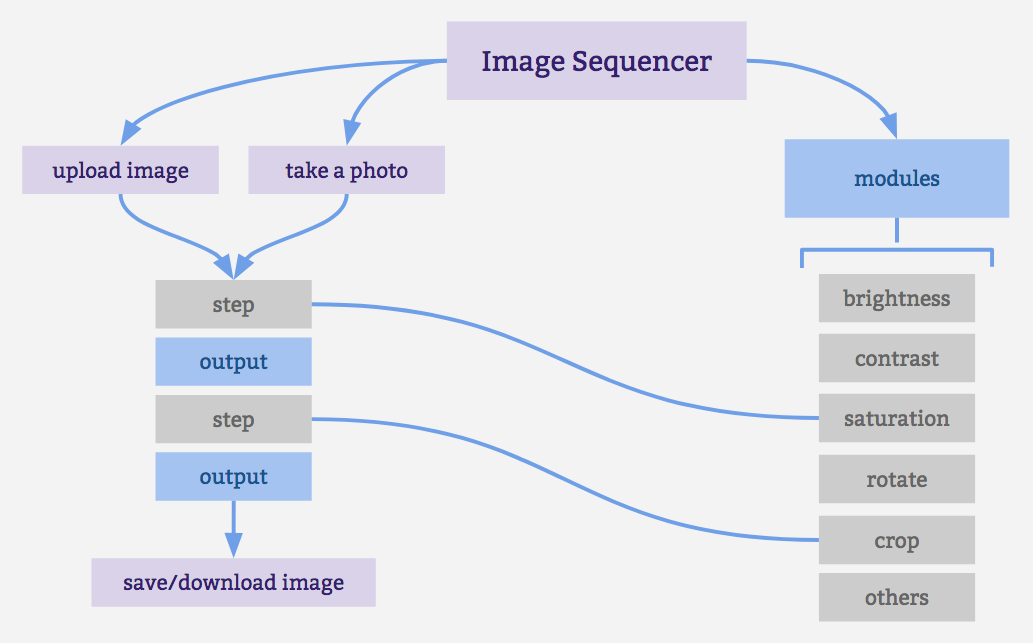
The following diagrams attempt to explain how the applications various components interconnect:
It also for prototypes other related ideas:
* filter-like image processing -- apply a transform to an image from a given source, like a proxy. I.e. [every image tile of a satellite imagery web map](https://publiclab.org/notes/warren/05-10-2018/prototype-filter-map-tiles-in-real-time-in-a-browser-with-imagesequencer-ndvi-landsat)
* test-based image processing -- the ability to create a sequence of steps that do the same task as other image processing tools, provable with example before/after images to compare with
* logging each step -- to produce an evidentiary record of modifications to an original image
* cascading changes -- change an earlier step's settings, and see those changes affect later steps
* "small modules" -- based extensibility: see [Contributing](https://github.com/publiclab/image-sequencer/blob/main/CONTRIBUTING.md)
## Examples
* [Simple Demo](https://sequencer.publiclab.org)
* [Latest Beta Demo](https://beta.sequencer.publiclab.org)
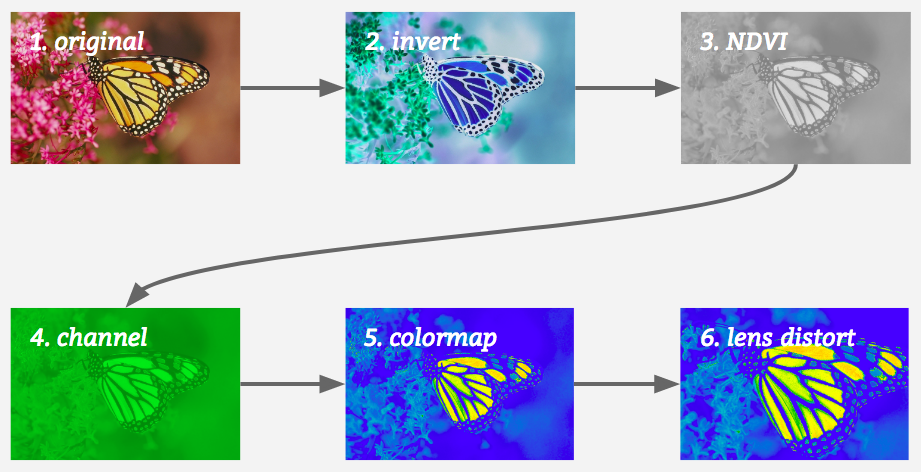
A diagram of this running 5 steps on a single sample image may help explain how it works:
## Jump to:
* [Installation](#installation)
* [Quick Usage](#quick-usage)
* [CLI Usage](#cli-usage)
* [Classic Usage](#classic-usage)
* [Method Chaining](#method-chaining)
* [Multiple Images](#multiple-images)
* [Creating a User Interface](#creating-a-user-interface)
* [Contributing](https://github.com/publiclab/image-sequencer/blob/main/CONTRIBUTING.md)
* [Submit a Module](https://github.com/publiclab/image-sequencer/blob/main/CONTRIBUTING.md#contributing-modules)
* [Get Demo Bookmarklet](https://publiclab.org/w/imagesequencerbookmarklet)
## Installation
This library conveniently works in the browser, in Node, and on the command line (CLI).
### Unix based platforms
You can set up a local environment to test the UI with `sudo npm run setup` followed by `npm start`.
### Windows
Our npm scripts do not support windows shells, please run the following snippet in PowerShell.
```powershell
npm i ; npm i -g grunt grunt-cli ; grunt build; grunt serve
```
In case of a port conflict please run the following
```powershell
npm i -g http-server ; http-server -p 3000
```
### Online one-click setup for contributing
Contribute to ImageSequencer using a fully featured online development environment that will automatically: clone the repo, install the dependencies and start the webserver.
[](https://gitpod.io/from-referrer/)
### Browser
Just include [image-sequencer.min.js](https://github.com/publiclab/image-sequencer/blob/stable/dist/image-sequencer.min.js) in the Head section of your web page. See the [demo here](https://sequencer.publiclab.org)!
### Node (via NPM)
(You must have NPM for this)
Add `image-sequencer` to your list of dependencies and run `npm install`
### CLI
Globally install Image Sequencer:
```
$ npm install image-sequencer -g
```
(You should have Node.JS and NPM for this.)
### To run the debug script
```
$ npm run debug invert
```
## Quick Usage
### Initializing the Sequencer
The Image Sequencer Library exports a function ImageSequencer which initializes a sequencer.
```js
var sequencer = ImageSequencer();
```
Image Sequencer can be used to run modules on an HTML Image Element using the
`replaceImage` method, which accepts two parameters - `selector` and `steps`.
`selector` is a CSS selector. If it matches multiple images, all images will be
modified. `steps` may be the name of a module or array of names of modules.
Note: Browser CORS Restrictions apply. Some browsers may not allow local images
from other folders, and throw a Security Error instead.
```js
sequencer.replaceImage(selector,steps,optional_options);
```
`optional_options` allows passing additional arguments to the module itself.
For example:
```js
sequencer.replaceImage('#photo','invert');
sequencer.replaceImage('#photo',['invert','ndvi-red']);
```
### Data URL usage
Since Image Sequencer uses data-urls, you can initiate a new sequence by providing an image in the [data URL format](https://developer.mozilla.org/en-US/docs/Web/HTTP/Basics_of_HTTP/Data_URIs), which will import into the demo and run:
[Try this example link with a very small Data URL](http://sequencer.publiclab.org/examples/#src=data:image/jpeg;base64,/9j/4AAQSkZJRgABAQAAAQABAAD/2wBDAAYEBQYFBAYGBQYHBwYIChAKCgkJChQODwwQFxQYGBcUFhYaHSUfGhsjHBYWICwgIyYnKSopGR8tMC0oMCUoKSj/2wBDAQcHBwoIChMKChMoGhYaKCgoKCgoKCgoKCgoKCgoKCgoKCgoKCgoKCgoKCgoKCgoKCgoKCgoKCgoKCgoKCgoKCj/wAARCAAQABADASIAAhEBAxEB/8QAFQABAQAAAAAAAAAAAAAAAAAAAAf/xAAUEAEAAAAAAAAAAAAAAAAAAAAA/8QAFQEBAQAAAAAAAAAAAAAAAAAABgj/xAAUEQEAAAAAAAAAAAAAAAAAAAAA/9oADAMBAAIRAxEAPwCdABykX//Z&steps=invert{})
To produce a data URL from an HTML image, see [this nice blog post with example code](https://davidwalsh.name/convert-image-data-uri-javascript).
## CLI Usage
Image Sequencer also provides a CLI for applying operations to local files. The CLI takes the following arguments:
-i | --image [PATH/URL] | Input image URL. (required)
-s | --step [step-name] | Name of the step to be added. (required)
-b | --basic | Basic mode only outputs the final image
-o | --output [PATH] | Directory where output will be stored. (optional)
-c | --config {object} | Options for the step. (optional)
--save-sequence [string] | Name space separated with Stringified sequence to save
--install-module [string] | Module name space seaprated npm package name
The basic format for using the CLI is as follows:
```
$ ./index.js -i [PATH] -s step-name
```
*NOTE:* On Windows you'll have to use `node index.js` instead of `./index.js`.
The CLI also can take multiple steps at once, like so:
```
$ ./index.js -i [PATH] -s "step-name-1 step-name-2 ..."
```
But for this, double quotes must wrap the space-separated steps.
Options for the steps can be passed in one line as JSON in the details option like
```
$ ./index.js -i [PATH] -s "brightness" -c '{"brightness":50}'
```
Or the values can be given through the terminal prompt like
 `save-sequence` option can be used to save a sequence and the associated options for later usage. You should provide a string which contains a name of the sequence space separated from the sequence of steps which constitute it.
```shell
sequencer --save-sequence "invert-colormap invert(),colormap()"
```
`install-module` option can be used to install new modules from npm. You can register this module in your sequencer with a custom namespace separated with the npm package name. Below is an example of the `image-sequencer-invert` module.
```shell
sequencer --install-module "invert image-sequencer-invert"
```
The CLI is also chainable with other commands using `&&`
```
sequencer -i -s && mv
`save-sequence` option can be used to save a sequence and the associated options for later usage. You should provide a string which contains a name of the sequence space separated from the sequence of steps which constitute it.
```shell
sequencer --save-sequence "invert-colormap invert(),colormap()"
```
`install-module` option can be used to install new modules from npm. You can register this module in your sequencer with a custom namespace separated with the npm package name. Below is an example of the `image-sequencer-invert` module.
```shell
sequencer --install-module "invert image-sequencer-invert"
```
The CLI is also chainable with other commands using `&&`
```
sequencer -i -s && mv